In surveying nothing is ever absolutely certain.
The product of surveying may be thought of as being in two parts, that is, the derivation of the desired quantities such as coordinates of, or distances between, points, and the assessment and management of the uncertainty of those quantities. In other words not only must the survey results be produced, but there should be numerical statements of the quality of the results for them to be meaningful.
Survey results can never be exactly true for a number of reasons. Surveying equipment, like any other piece of equipment in the real world can only be manufactured to a certain level of precision. This means that there is a limit upon the quality of a measurement that can be made by any instrument. Although survey measuring procedures are designed to remove as many errors as possible there will always be some sources of error that cannot be compensated for. Whatever the scale on the instrument, be it digital or analogue, there is a limit to the number of significant digits that it can be read to. Surveyors are trained to get the most out of their instrumentation, but no observer can make perfect measurements. There is a limit to the steadiness of the hand and the acuity of the eye. All survey measurements are subject to external factors, for example all observed angles are subject to the effects of refraction, and observed distances, whether EDM or tape, will vary with temperature. The process of getting from observations to coordinates involves reductions of, and corrections to, observed data. Some mathematical formulae are rigorous, others are approximate. These approximations and any rounding errors in the computations will add further error to the computed survey results.
The surveyor’s task is to understand the source and nature of the errors in the survey work and appreciate how the observing methods and the computing process may be designed to minimize and quantify them. It is important to understand the nature of the measurement process. Firstly, the units in which the measurement is to take place must be defined, for example distances may be measured in metres or feet and angles may be in degrees, gons or mils. Next, the operation of comparing the measuring device with the quantity to be measured must be carried out, for example laying a tape on the ground between two survey stations. A numerical value in terms of the adopted units of measure is then allocated to the measured quantity. In one of the examples already quoted the readings of the tape at each station are taken and the difference between them is the allocated numerical value of the distance between the stations. The important point is that the true value of the interstation distance is never known, it can only be estimated by an observational and mathematical process.
Since the true value of a measurement or coordinate can never be known it is legitimate to ask what the accuracy or the precision is of, or the error in, the estimate of that measurement or coordinate. Accuracy, precision and error have specific meanings in the context of surveying. Accuracy is a measure of reliability. In other words
Accuracy = True value − Most probable value
where the ‘most probable value’ is derived from a set of measurements. In the example above the most probable value might be the arithmetic mean of a number of independent measurements. Since the true value is never known then it is also impossible for the accuracy to be known. It can only be estimated.
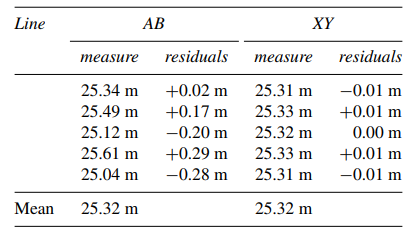
Accuracy can be estimated from ‘residuals’, for example, in the two sets of measurements below, which mean is the more accurate, that of the measurements of line AB or line XY?

The residuals in this case are differences between the individual observations and the best estimate of the distance, that is the arithmetic mean. It is clear from inspection of the two sets of residuals that the length of line XY appears to be more accurately determined than that of line AB.
Precision is a measure of repeatability. Small residuals indicate high precision, so the mean of line XY is more precisely determined than the mean of line AB. High precision does not necessarily indicate high accuracy. For example, if the tape used to measure line XY was in decimals of a yard and the surveyor assumed it was in metres, then the computed mean of line XY would be very precise but also very inaccurate.
In general
Precision > Accuracy
but in practice the computed precision is often taken as the assessed accuracy.
Coordinates and their accuracy and precision may be stated as being ‘relative’ or ‘absolute’. Absolute values are with respect to some previously defined datum. Relative values are those with respect to another station. For example, the Ordnance Survey (OS) coordinates of a GPS passive network station might be assumed to be absolute coordinates since they are with respect to the OSTN02 datum of UK. The coordinates of a new control station on a construction site may have been determined by a series of observations including some to the GPS station. The precision of the coordinates of the new station may better be expressed with respect to the OSTN02 datum, or alternatively with respect to the coordinates of another survey station on site. In the former case they may be considered as absolute and in the latter as relative. The difference between absolute and relative precisions is largely one of local definition and therefore of convenience. In general
Relative precision > Absolute precision
Accuracy and precision are usually quoted as a ratio, or as parts per million, e.g. 1:100 000 or 10 ppm, or in units of the quantity measured, e.g. 0.03 m.
Error is the difference between an actual true valve and an estimate of that true value. If the estimate is a bad one, then the error will be large.
Of these three concepts, accuracy, precision and error, only precision may be numerically defined from appropriate computations with the observations. Accuracy and error may be assumed, sometimes erroneously, from the precision but they will never be known for sure. The best estimate of accuracy is usually the precision but it will usually be ove


