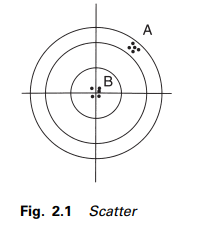
The basic concept of errors in the data captured by the surveyor may be likened to target shooting.
In the first instance, let us assume that a skilled marksman used a rifle with a bent sight, which resulted in his shooting producing a scatter of shots as at A in Figure 2.1.
That the marksman is skilled (or consistent) is evidenced by the very small scatter, which illustrates excellent precision. However, as the shots are far from the centre, caused by the bent sight (systematic error), they are completely inaccurate. Such a situation can arise in practice when a piece of EDM equipment produces a set of measurements all agreeing to within a few millimetres (high precision) but, due to an

operating fault and lack of calibration, the measurements are all incorrect by several centimetres (low accuracy). If the bent sight is now corrected, i.e. systematic errors are minimized, the result is a scatter of shots as at B. In this case, the shots are clustered near the centre of the target and thus high precision, due to the small scatter, can be related directly to accuracy. The scatter is, of course, due to the unavoidable random errors.
If the target was now placed face down, the surveyors’task would be to locate the most probable position of the centre based on an analysis of the position of the shots at B. From this analogy several important facts emerge, as follows.
(1) Scatter is an ‘indicator of precision’. The wider the scatter of a set of results about the mean, the less repeatable the measurements are.
(2) Precision must not be confused with accuracy; the former is a relative grouping without regard to nearness to the truth, whilst the latter denotes absolute nearness to the truth.
(3) Precision may be regarded as an index of accuracy only when all sources of error, other than random errors, have been eliminated.
(4) Accuracy may be defined only by specifying the bounds between which the accidental error of a measured quantity may lie. The reason for defining accuracy thus is that the absolute error of the quantity is generally not known. If it were, it could simply be applied to the measured quantity to give its true value. The error bound is usually specified as symmetrical about zero. Thus the accuracy of measured quantity x is x ± εx where εx is greater than or equal to the true but unknown error of x.
(5) Position fixing by the surveyor, whether it is the coordinate position of points in a control network, or the position of topographic detail, is simply an assessment of the most probable position and, as such, requires a statistical evaluation of its precision.
Further definitions
(1) The true value of a measurement can never be found, even though such a value exists. This is evident when observing an angle with a one-second theodolite; no matter how many times the angle is read, a slightly different value will always be obtained.


