
A concrete truck is booked for the morning, formwork is ready, and reinforcement has passed inspection. Then a basic but costly question comes up: how much concrete should actually be ordered?
Order too little, and a pour may be interrupted while workers, equipment, and fresh concrete wait. Order too much, and the project pays for unused material and must manage leftover concrete responsibly. On anything from a garden slab to a multistorey frame, reliable quantity takeoff starts with sound volume calculations.
The arithmetic is usually straightforward. The real challenge is reading dimensions correctly, separating shapes, allowing for field realities, and not counting the same piece of concrete twice.
This guide explains a practical method for calculating concrete volume for slabs, beams, columns, footings, and combined structural elements. The examples are hypothetical, but the workflow reflects the checks used in everyday estimating and site planning.
🧱 Start with the Meaning of Concrete Volume
Concrete volume is the amount of space occupied by the finished concrete element. It is normally measured in cubic metres (m³), although cubic feet or cubic yards may be used in some regions.
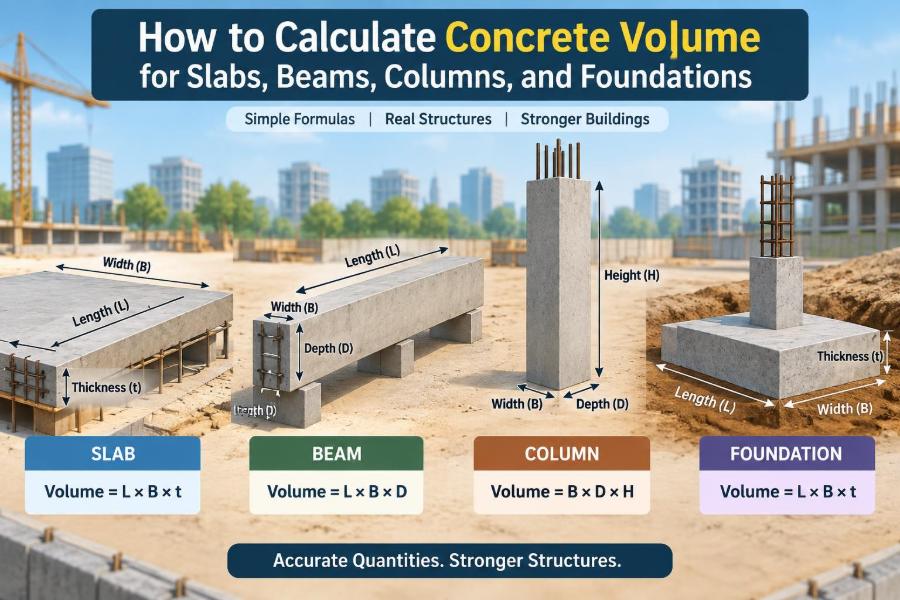
Volume is not the surface area of a slab, nor is it the weight of concrete. It has three dimensions: length, width, and depth. For a simple rectangular element:
Volume = Length × Width × DepthEvery dimension in that equation must use the same unit. A result based on metres produces cubic metres; a result based on feet produces cubic feet.
📐 Read Drawings Before Reaching for a Calculator
Dimensions should come from the latest approved structural and architectural drawings, specifications, and issued site instructions. A preliminary plan, an old revision, or a scaled measurement from a PDF can lead to a quantity that no longer matches the work.
Check whether stated dimensions are:
- overall dimensions or clear dimensions between faces,
- structural dimensions or finished dimensions,
- given in millimetres, metres, inches, or feet,
- constant or varying across the element.
For structural work, use the dimensions defining the actual concrete shape. Finishes, screeds, brickwork, cladding, and voids may be measured separately unless the scope specifically includes them.
🔄 Convert Units Before Multiplying
Mixing metres with millimetres is one of the most common sources of errors. A slab 150 mm thick must be converted to 0.15 m before it is multiplied by length and width measured in metres.
| Common conversion | Equivalent |
|---|---|
| 1 metre | 1,000 millimetres |
| 100 millimetres | 0.10 metre |
| 150 millimetres | 0.15 metre |
| 200 millimetres | 0.20 metre |
| 1 cubic metre | 1,000 litres |
Do not convert only the thickness and leave the other dimensions in feet, for example. Convert all dimensions into one system first, then calculate.
📝 Build a Simple Quantity Takeoff Sheet
A quantity takeoff is a structured record of what has been measured. Even for a small job, write each item down rather than relying on a final calculator number.
A useful sheet includes the element reference, dimensions, formula, number of identical units, gross volume, deductions, and net volume. It creates a clear audit trail when someone asks why the concrete order differs from a quick estimate.
Element: Pad footing F1
Dimensions: 2.00 m × 2.00 m × 0.50 m
Quantity: 4
Gross volume: 2.00 × 2.00 × 0.50 × 4 = 8.00 m³
Round display values sensibly, but retain enough decimal places in working calculations to avoid cumulative rounding errors.
⬜ Calculate Rectangular Slabs
A uniform rectangular slab is the most direct case. Multiply its length by width by thickness. Suppose a floor slab is 12 m long, 8 m wide, and 150 mm thick:
Thickness = 150 mm ÷ 1,000 = 0.15 m
Volume = 12 × 8 × 0.15 = 14.40 m³
This is the concrete volume of the slab portion alone, assuming its thickness is uniform and no openings or thickened zones are included.
📏 Break Irregular Slabs into Simple Shapes
L-shaped, stepped, or angled slabs should rarely be forced into one oversized rectangle. Divide the plan into rectangles, triangles, or other measurable shapes, calculate each volume, and add them.
For an L-shaped slab, one method is to calculate a large enclosing rectangle and subtract the missing corner. Another is to split the L into two non-overlapping rectangles. Choose the approach that makes overlap least likely.
Sketch the divisions directly on the drawing. A marked-up plan is often more valuable than a complicated formula because it lets another person verify what each dimension represents.
🔺 Use the Right Formula for Triangular Areas
Slabs at ramps, landings, and irregular plot edges may include triangular portions. The area of a right triangle is:
Triangle area = ½ × base × perpendicular heightMultiply that area by slab thickness to obtain volume. For a triangular slab 4 m wide at its base, 3 m long at a right angle, and 0.15 m thick:
Volume = ½ × 4 × 3 × 0.15 = 0.90 m³Use the perpendicular height, not a diagonal side length. That distinction is especially important where plans show sloping property lines or ramp edges.
🕳️ Deduct Slab Openings Carefully
Large penetrations such as stairwells, lift shafts, service openings, and planned floor drains reduce concrete volume. Calculate the opening volume and subtract it from the gross slab volume.
A 2 m by 1.5 m opening through a 150 mm slab removes:
2 × 1.5 × 0.15 = 0.45 m³Very small sleeves, conduit holes, and minor penetrations are sometimes ignored in a high-level estimate, depending on the measurement rules and project requirements. That is a commercial convention, not a mathematical rule; follow the applicable specification.
📉 Account for Slabs with Changing Thickness
A slab is not always a constant-depth box. It may slope to drains, thicken at edges, include drop panels near columns, or have local haunches. These features need their own calculation.
For a uniformly tapering slab, use the average thickness when the plan area is constant:
Average thickness = (thickness at one side + thickness at other side) ÷ 2For example, a 30 m² slab tapering evenly from 100 mm to 160 mm has an average thickness of 130 mm, giving 3.90 m³. This average method is suitable only for a regular, linear change in depth; complex profiles should be divided into smaller known shapes.
🏗️ Measure Thickened Slab Edges Separately
Ground-bearing slabs often have thickened perimeter edges, sometimes called edge beams or turned-down edges. If the slab calculation already uses the full thickened depth, do not add the edge volume again.
A safer method is to calculate the standard slab at its nominal thickness, then add only the extra depth in the thickened strip. If a 0.30 m-wide edge is 0.20 m deeper than the main slab, multiply perimeter length by 0.30 m by 0.20 m.
At corners, confirm whether continuous strip lengths overlap. A plan sketch prevents an accidental double count.
📦 Calculate Straight Rectangular Beams
A beam with a rectangular cross-section is calculated as length times width times overall depth. A beam 6 m long, 300 mm wide, and 500 mm deep has a gross volume of:
6 × 0.30 × 0.50 = 0.90 m³“Overall depth” matters. It describes the full beam depth, often measured from its soffit, or underside, to its top surface. Whether part of this is already included in a slab depends on how the beam and slab are measured together.
⚖️ Avoid Double-Counting Beams Within Slabs
When a downstand beam projects below a slab, the gross beam volume includes a portion that occupies the same space as the slab. Adding gross slab volume and gross beam volume would count that shared upper portion twice.
There are two valid approaches:
- Calculate the slab at its full plan area and add only the beam depth below the slab.
- Calculate gross beam volume, then deduct the overlapping slab strip.
For a 0.15 m slab and a beam 0.50 m overall deep, the additional downstand depth is 0.35 m. For a 6 m long, 0.30 m wide beam, add 6 × 0.30 × 0.35 = 0.63 m³ to the slab quantity.
🪜 Deal with Upstand Beams and Curved Beams
An upstand beam rises above the slab. If the base slab has already been measured, calculate the beam as its width times its height above the slab times its length. The same no-overlap principle applies.
Curved beams need an accurate centreline length or a segmented approximation from the drawing. Use the specified cross-section throughout, but be alert for variations at supports, connections, and transitions. Estimating a curved beam from its straight end-to-end chord will understate its volume.
🧍 Calculate Square and Rectangular Columns
For a prismatic column, meaning one with the same cross-section throughout its height, multiply width by depth by height. A column 400 mm by 400 mm and 3.2 m high contains:
0.40 × 0.40 × 3.20 = 0.512 m³Multiply this by the number of identical columns, but verify that they truly are identical. Column schedules often change section sizes from one floor to another or even within the same level.
Measure height between the structural levels stated on the drawings. Do not assume that a room’s finished ceiling height equals the column’s concrete height.
⭕ Calculate Circular Columns
The volume of a circular column is its circular area multiplied by its height. The area is:
Area = π × radius²For a 500 mm diameter column, the radius is 250 mm, or 0.25 m. At 3 m high:
Volume = π × 0.25² × 3 ≈ 0.589 m³Always divide the diameter by two to obtain radius. Using the full diameter in the radius position makes the calculated area four times too large.
🔻 Treat Tapered Columns as Special Shapes
A tapered column changes cross-section between its top and base, so a simple rectangular prism formula is not exact. If it is a regular taper, use the appropriate frustum formula or obtain a design-office quantity.
For early planning, an average cross-sectional area may be an acceptable approximation only when clearly identified as an estimate. Construction ordering and contractual measurement require the project’s specified method and sufficiently reliable geometry.
This is a useful reminder: a formula is only as good as the shape it represents.
🟫 Calculate Isolated Pad Footings
An isolated pad footing supports an individual column. A rectangular pad footing with vertical sides is calculated exactly like a rectangular slab, but its larger depth should be carefully recorded.
A footing 2.2 m by 2.2 m by 0.6 m contains:
2.2 × 2.2 × 0.6 = 2.904 m³If the column starts on top of the footing, measure the footing and column as separate elements. They touch, but they do not occupy the same volume.
🪨 Include Pedestals and Stepped Footings
Some foundations have a broad base, a smaller upper step, and a pedestal beneath the column. Calculate each distinct block separately, then add the volumes. This approach is clearer than trying to create one formula for the whole assembly.
For example, calculate the bottom pad, then add the volume of the upper step only above the bottom pad, and then add the pedestal. Do not calculate a full-height large base and then add every upper component on top; that would include overlapping concrete.
📏 Calculate Strip Footings by Length
Strip footings run beneath load-bearing walls or rows of columns. Their volume is normally footing length times width times depth. A 20 m strip, 0.70 m wide and 0.30 m deep, requires:
20 × 0.70 × 0.30 = 4.20 m³At T-junctions and crossings, examine the layout. If separate strip lengths are added without adjustment, the shared intersection volume may be counted twice. Measure a continuous footing path once, or deduct overlaps deliberately.
🧭 Handle Raft Foundations by Zones
A raft foundation spreads building loads over a large area. Although it may look like one giant slab, it can include varying thicknesses, deep bands, column heads, pits, and edge thickenings.
Divide the raft into zones of constant thickness. Calculate the main mat first, then add extra-depth strips, drops, or local blocks. Deduct pits and major openings only after confirming whether their walls and bases are separate concrete items.
Clear zone labels are essential. Rafts are a common place for a small interpretation error to become a substantial volume difference.
🌊 Calculate Sloped Footings and Blinding Layers
Footings with sloping sides are not rectangular blocks. If the slope is regular, calculate the volume as a frustum or split the shape into a central rectangular prism plus triangular wedge portions.
Blinding concrete is a thin, low-strength layer placed over prepared ground to create a clean working surface. It is often measured separately from the structural footing. Its volume is plan area times specified thickness, including any required projection beyond the footing edges.
Do not assume blinding thickness or its extent. Both should come from the drawings or project specification.
🚧 Recognize What Is Not Concrete
Excavation volume, compacted sub-base, formwork area, reinforcement weight, and concrete volume are different quantities. They may all be needed for planning, but none can substitute for another.
For example, a footing excavation is usually wider and deeper than the footing itself to allow working space, blinding, and formwork. Ordering concrete based on excavation dimensions would significantly overstate the required material.
Likewise, reinforcement displaces a small volume, but it is generally not deducted from ordinary concrete ordering unless a specific measurement procedure requires it.
➖ Decide When Deductions Are Appropriate
Deductions apply to permanent voids: major openings, blockouts, ducts, pits, sleeves, or recesses that will not contain concrete. The decision should be based on the project’s measurement rules and practical significance.
Deducting every tiny penetration can consume more time than its precision is worth during an early estimate. Conversely, overlooking a large service opening in a heavily serviced slab can materially distort the total.
Record both the gross and net quantities. This makes assumptions visible and helps the site team understand why a number changed.
🧮 Use a Sensible Waste Allowance
Theoretical volume is not always the same as the volume ordered. Small losses can arise from concrete retained in truck chutes and pumps, uneven excavation faces, minor formwork irregularities, spillage, and last-minute detailing changes.
A waste or contingency allowance may therefore be added after the net measured volume is established. The suitable allowance is project-specific: it depends on element geometry, placing method, supplier arrangements, access, quality control, and the consequences of a short pour.
Do not use a fixed percentage blindly. State the allowance separately so that the measured volume and the procurement decision remain distinguishable.
🚚 Translate Volume into a Concrete Order
Ready-mix concrete is commonly ordered by volume, but delivery capacity and minimum-load policies vary by supplier. Confirm the ordered quantity, concrete grade, slump or workability requirements, admixtures, delivery sequence, and placement time with the relevant project team and supplier.
For a large continuous pour, ordering in staged loads can help coordinate placing and finishing. For a small pour, a practical order may be influenced by the supplier’s delivery increments, but the structural quantity should still be calculated accurately first.
Never use the calculated volume alone to decide whether a pour is ready. Formwork stability, reinforcement cover, access, crew capacity, and curing arrangements matter just as much.
✅ Check Dimensions with Independent Methods
A reliable estimate deserves a second check. Recalculate key elements using a different breakdown, compare the result with a drawing-based schedule, or ask another team member to review the marked-up plan.
Useful reasonableness checks include:
- Does a 150 mm slab over 100 m² equal about 15 m³?
- Does the result increase in proportion when thickness doubles?
- Have all repeated columns and footings been counted?
- Does the total appear plausible against the building footprint and structural depth?
These checks do not replace measurement, but they catch misplaced decimal points and omitted elements surprisingly well.
⚠️ Watch for Common Calculation Mistakes
Most concrete quantity errors are not advanced mathematics problems. They arise from a few repeatable habits: reading one dimension incorrectly, applying a formula to the wrong shape, or forgetting what another calculation already includes.
- Using millimetres directly with metre dimensions.
- Adding gross beam volume to a full slab volume.
- Ignoring slab drops, thickened edges, or local foundation steps.
- Counting intersecting strip footings twice.
- Measuring from architectural finishes rather than structural faces.
- Rounding every line item before adding the total.
- Ordering theoretical volume with no consideration of placement losses.
The cure is disciplined documentation, not more complicated software.
💻 Use Spreadsheets and Models with Care
Spreadsheets are excellent for repeated elements and revision tracking. Set up separate input cells for dimensions and quantities, use consistent units, and protect formula cells where possible. A visible formula is easier to audit than a manually typed total.
Building information models can produce quantities quickly, but model outputs still require review. Check model element classification, openings, overlap rules, design revisions, and whether non-structural concrete has been included. Digital tools accelerate measurement; they do not remove engineering judgment.
📋 Follow the Project’s Measurement Rules
Quantity measurement may be governed by a bill of quantities method, contract documents, client requirements, or local industry practice. These rules can define how small openings, laps, construction joints, blinding, and waste are treated.
For procurement, the site may need a practical order quantity. For payment, the contract may require a different measured quantity. Keep these purposes separate and avoid assuming that a supplier invoice, a design model total, and a valuation quantity must match exactly.
When the work is safety-critical or contract-sensitive, seek confirmation from the responsible engineer, estimator, or quantity surveyor rather than relying on a generic rule.
🔍 Work Through a Small Combined Example
Consider a hypothetical small structure with a 10 m by 6 m slab, 150 mm thick; two downstand beams, each 6 m long by 0.30 m wide, extending 0.25 m below the slab; and four columns, each 0.30 m by 0.30 m by 3 m high.
The slab volume is 10 × 6 × 0.15 = 9.00 m³. The extra beam volume is 2 × 6 × 0.30 × 0.25 = 0.90 m³. The columns total 4 × 0.30 × 0.30 × 3 = 1.08 m³.
The combined theoretical structural concrete volume is 10.98 m³. The critical detail is that the beams use only their depth below the slab, so the slab-and-beam overlap is not counted twice.
🧠 Use a Repeatable Site Workflow
A repeatable sequence makes calculations faster and easier to review:
- Collect the current drawings and identify the concrete scope.
- List each slab, beam, column, footing, and special feature.
- Convert dimensions to a consistent unit system.
- Calculate simple shapes first and split complex shapes into parts.
- Deduct genuine voids and prevent overlaps.
- Add identical items by their verified quantities.
- Check totals independently and document assumptions.
- Apply any agreed procurement allowance separately.
This process works whether the project is a small residential extension or a detailed structural package.
🎯 The Core Principle: Measure the Actual Shape Once
Every reliable concrete calculation comes back to one principle: measure the actual three-dimensional concrete shape, and measure each portion once. Simple formulas become dependable when their boundaries are clear.
Start with approved dimensions, keep units consistent, divide complex geometry into understandable pieces, and separate structural volume from ordering allowances. When something is unclear—a sloping face, a beam-slab intersection, or an opening—sketch it and ask what solid volume is truly present.
Accurate concrete quantities are less about difficult arithmetic than about careful interpretation, transparent assumptions, and systematic checking.
With that discipline, a volume calculation becomes a practical construction tool rather than a last-minute guess at the batching plant. 🧱📐🚚