
A small building pad, driveway, retaining wall, trench, or backyard pond can look straightforward until someone asks a deceptively simple question: how much soil has to move?
The answer affects excavation time, truck loads, disposal arrangements, imported fill, equipment selection, and the project budget. Ordering too little fill can stop work halfway through. Ordering too much can leave an expensive pile with nowhere to go.
Earthwork estimating does not require advanced surveying software for every small project. It does require a clear understanding of existing ground, proposed ground, dimensions, slopes, and how soil changes volume when excavated or compacted.
With a measured site, sensible assumptions, and a transparent calculation method, students and site teams can create a defensible preliminary estimate—and know when it is time to involve a surveyor or geotechnical professional.
🧱 Start with the meaning of earthwork volume
Earthwork volume is the quantity of soil or rock that must be excavated, placed, hauled, stockpiled, or compacted to achieve a proposed shape or elevation.
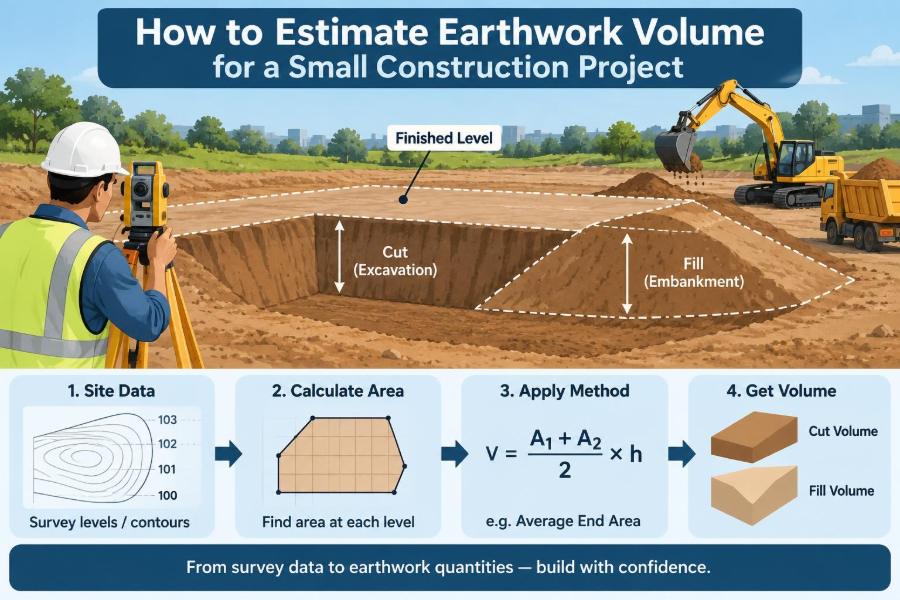
In basic terms, it is the space between the existing ground surface and the finished design surface. Where the design sits below existing ground, the work is cut or excavation. Where the design sits above it, the work is fill or embankment.
Volumes are commonly expressed in cubic metres (m³) or cubic yards (yd³). Keep one unit system throughout the calculation.
🎯 Know what the estimate needs to answer
Before calculating, decide which volume is needed. A conceptual budget may only need total excavation and total fill. A construction plan may need separate quantities for topsoil stripping, unsuitable material removal, structural fill, drainage stone, and trench backfill.
Different decisions rely on different volumes. The truck dispatcher cares about loose excavated material, while the compaction crew cares about compacted fill placed in layers.
- How much material will be cut from the site?
- Can usable excavated soil supply the required fill?
- How much material must be imported or exported?
- What volume must be allowed for bulking, compaction, and waste?
🗺️ Collect the right site information first
A good calculation cannot rescue poor field data. Start with a simple base plan showing the property limits, work area, existing structures, utilities, drainage features, and access routes.
You also need existing elevations at enough points to describe the ground shape. For a very small, nearly level area, a tape measure and level may be adequate. Uneven sites need a grid survey, total station, GNSS survey, or other reliable elevation method.
Record the location and datum used for every elevation. A datum is simply the common reference level from which heights are measured.
📏 Establish existing ground levels
Existing ground level, often abbreviated EGL, is the elevation of the site before construction. It is not enough to measure only the corners if the surface contains a dip, mound, ditch, or steep change in slope.
For small pads and yards, take readings on a regular grid and add extra points wherever the ground changes noticeably. A 5 m grid may suit a modest open area; smaller spacing is sensible around irregular features.
Sketch each point and write down its elevation carefully. A missing decimal place can create a major quantity error.
🏗️ Define the proposed finished surface
The finished grade is the intended elevation after earthwork. It may be a flat building platform, a driveway sloping toward drainage, or a landscaped area with designed falls.
Use drawings whenever they exist. If the project is informal, state the design assumptions explicitly: finished floor level, driveway gradient, wall footing depth, or drainage fall. An estimate is only as meaningful as the design it represents.
Do not confuse finished grade with formation level. Formation is the prepared soil surface beneath pavement, slabs, or fill layers; finished grade may sit above it after gravel, concrete, turf, or other finishes are added.
🔍 Separate cut from fill
At each measured point, compare existing ground with proposed grade. If existing ground is higher, that location contributes cut. If proposed grade is higher, it contributes fill.
A signed depth convention helps prevent confusion. For example, define cut depth as positive when EGL exceeds design level, and fill depth as positive when design level exceeds EGL. Never add cut and fill together before reporting them separately.
On a sloping site, one part of a platform may require excavation while another requires fill. This is normal and often desirable when designers try to balance material on site.
📐 Use consistent dimensions and units
Volume is area multiplied by depth. If plan dimensions are in metres and depths are in metres, the result is cubic metres. If dimensions are in feet, the result is cubic feet before any conversion to cubic yards.
Common errors arise when one dimension comes from a drawing in millimetres and another comes from a site tape in metres. Convert everything before calculation.
| Quantity | Metric relationship | Practical use |
|---|---|---|
| Area | length × width = m² | Pad, strip, grid cell |
| Volume | area × average depth = m³ | Cut or fill estimate |
| Truck load count | loose volume ÷ truck capacity | Haul planning |
| Fill order | compacted fill adjusted for compaction | Material procurement |
📦 Begin with the simple rectangular-prism method
The simplest volume formula is V = L × W × D. It works well when the excavation has vertical sides, a rectangular plan, and a uniform depth.
For example, a hypothetical utility trench 12 m long, 0.6 m wide, and 0.9 m deep has a theoretical in-place excavation volume of 6.48 m³.
Real trenches may need sloped sides, shoring, bell holes, or wider working space. The basic prism is a starting point, not an automatic final answer.
📉 Calculate average-end-area volumes for changing depths
When depth varies gradually along a strip, use the average-end-area method. Find the cross-sectional area at each end, average the two areas, then multiply by the distance between them.
The formula is: volume = (A₁ + A₂) ÷ 2 × L. It is useful for road cuts, drainage swales, trenches with changing depth, and elongated ramps.
Use shorter intervals where the surface changes rapidly. The method assumes the shape transitions reasonably smoothly between sections.
🧮 Apply the grid method to irregular pads
The grid method is one of the most practical manual approaches for a small irregular site. Divide the work area into equal squares or rectangles, calculate the cut or fill depth at each grid intersection, and estimate each cell volume from its average depth.
For each cell, multiply its plan area by the average of the corner depths. Keep cut and fill separate if the cell crosses the transition line between them; otherwise, averaging can hide both quantities.
This approach produces a more realistic result than treating a lumpy site as one flat rectangle.
🧾 Work through a small grid example
Imagine a proposed 10 m by 10 m level pad split into four equal 5 m by 5 m cells. Suppose one cell has cut depths of 0.10 m, 0.20 m, 0.30 m, and 0.40 m at its corners.
The average depth is 0.25 m. The cell area is 25 m², so its approximate cut volume is 6.25 m³. Repeat this for every cell and total the cuts and fills independently.
This is a hypothetical example. In practice, do not average positive cut and positive fill depths in the same cell; split that cell along the zero-depth line where possible.
📐 Understand contours and cross sections
Contour plans show lines of equal elevation. Closely spaced contours indicate steeper ground, while wide spacing indicates gentler terrain. They can help you anticipate where cut and fill will occur before detailed calculations begin.
Cross sections provide another useful view: imagine slicing through the site and looking at the ground profile. They reveal slopes, ditches, embankments, and abrupt grade changes that a plan alone can conceal.
For small jobs, hand-drawn cross sections at key locations are often enough to check whether a grid calculation makes physical sense.
🪜 Account for side slopes in excavations
Many excavations cannot safely or practically be cut with vertical sides. Soil type, groundwater, nearby loads, depth, and local safety requirements influence whether sloping, benching, or shoring is necessary.
A sloped excavation has a larger top width than its bottom width, so its volume exceeds the simple bottom-width prism. For a symmetrical trench, calculate areas from the actual section geometry and apply the average-end-area method.
Never select a trench slope from a rule of thumb for a safety-critical excavation. The required protective system should be determined by competent site personnel under applicable requirements and actual soil conditions.
🧱 Include working room and overexcavation
Excavations for footings, retaining walls, and buried services frequently need space beyond the permanent structure. Workers may need room for formwork, waterproofing, pipe joining, inspection, or compaction equipment.
Overexcavation may also be required when weak, organic, wet, or disturbed soil must be removed below design formation. This material should not automatically be counted as reusable fill.
Show these allowances as separate items. Doing so makes later revisions easier when the construction method changes.
🌱 Measure topsoil stripping separately
Topsoil is commonly stripped before placing structural fill or building pavements. It contains organic matter and roots that can decay or compress, making it unsuitable beneath many engineered works.
Calculate stripped topsoil as its plan area multiplied by average stripping depth. Its boundary may extend beyond the building footprint to cover access, grading, and stockpile areas.
Topsoil is often valuable for final landscaping, but it should be stockpiled separately from subsoil and protected from contamination where practical.
🪨 Distinguish soil, rock, and unsuitable material
Not all excavated material behaves alike. Ordinary soil, weathered rock, hard rock, demolition debris, contaminated soil, and organic deposits can require very different equipment, handling, disposal, and testing.
A preliminary earthwork estimate should identify uncertainty rather than bury it in one generic excavation line item. A test pit, borehole log, local site history, or visible outcrop may reveal a material change that matters.
Quantity calculations describe volume; they do not by themselves establish whether material is suitable for reuse.
💨 Understand bank, loose, and compacted volumes
Soil has different volumes at different stages. Bank volume is material in its natural, undisturbed state. Loose volume is excavated material after it expands. Compacted volume is fill after placement and compaction.
This distinction is central to haulage and import calculations. A 10 m³ excavation measured in the ground may occupy more than 10 m³ in a truck, while 10 m³ of completed compacted fill may require more loose material delivered to site.
The relationship depends on soil type, moisture, particle grading, compaction specification, and handling. Use project-specific factors when available; otherwise, label assumptions clearly and treat them as preliminary.
🚚 Convert excavation quantities into truck planning
Truck capacity is usually stated as a loose volume, but a truck may reach its legal mass limit before its body is full, particularly with wet or dense soil. Capacity therefore cannot be treated as a fixed answer for every material.
Start with estimated loose volume, then divide by the practical payload volume agreed with the hauler. Add a contingency for variable loading and site conditions rather than promising an exact number of loads.
Also check access. A narrow residential street, soft ground, overhead lines, or limited turning space can control the haul plan as much as the calculated quantity.
⚖️ Aim for cut-and-fill balance, but test it
A balanced site theoretically reuses excavated material to create required fill, reducing export and import. It can lower hauling and environmental disturbance when the material is suitable and can be placed where needed.
But equal bank volumes do not guarantee balance. Excavated clay may be too wet for structural fill, stripped topsoil is usually excluded, and compaction changes the required quantity. Timing matters too: fill may be needed before usable excavation is available.
Think of balance as a design target that needs material-quality and volume-conversion checks.
🧪 Check whether excavated soil is reusable
Reuse depends on the project requirements. Granular material may compact well for some applications, while highly plastic clay may be sensitive to moisture and difficult to place at the required density.
Soil contaminated by debris, organics, or other unsuitable matter may require segregation or disposal. Material beneath foundations or pavements commonly has stricter performance needs than landscape fill.
Where structural performance matters, rely on the project geotechnical information and testing requirements rather than visual judgment alone.
💧 Consider water and weather conditions
Water can change both the practical volume operation and the material condition. Rain may soften formation, increase truck weights, cause rutting, and turn otherwise usable fill into material that cannot be compacted effectively.
Groundwater or perched water can require dewatering, alter excavation stability, and delay work. Drainage routes must be planned so that pumped or surface water does not create erosion or affect neighbouring areas.
A dry-season estimate should still identify wet-weather risk if the construction schedule may extend beyond dry conditions.
🛣️ Calculate trenches with the installed work in mind
For a service trench, excavation is only one quantity. The final backfill volume is reduced by the pipe, conduit, bedding, surround material, chambers, and any concrete encasement occupying space in the trench.
Calculate trench excavation from the actual excavated profile, then subtract permanent installed volumes when estimating backfill. Separate selected bedding and pipe surround from general backfill because they are often different materials.
This prevents a common error: ordering general fill equal to the entire trench excavation even though much of that space will be occupied by the utility system.
🧱 Allow for pavements, slabs, and granular layers
A driveway or slab area may involve stripping, subgrade trimming, subbase, base course, concrete, and final surfacing. Each layer occupies depth and affects the formation elevation.
For example, if the finished driveway surface must meet an existing threshold, work downward through the thicknesses to find the required subgrade. Then compare that subgrade with existing ground to calculate cut or fill.
Drawing a vertical layer stack avoids accidentally calculating earthwork to the final surface when the soil actually stops below several constructed layers.
🧭 Keep a clear calculation sheet
A transparent estimate is easier to review, revise, and defend. Whether you use a spreadsheet or paper, include point coordinates, existing levels, proposed levels, depth differences, cell areas, and separate cut/fill subtotals.
Useful headings include:
- Grid point or station reference
- Existing ground elevation
- Design elevation
- Cut or fill depth
- Cell or section area
- Bank volume, loose volume, and compacted volume where applicable
- Assumptions, exclusions, and revision date
A calculation sheet is not bureaucracy. It is the audit trail that lets another person find an incorrect level or update the work after a design change.
💻 Use digital tools without losing engineering judgment
Spreadsheets are excellent for grid calculations and scenario testing. CAD models, site takeoff tools, and civil design software can calculate surfaces quickly when supplied with reliable survey and design data.
However, software produces a precise-looking result even when the input points are sparse or the proposed surface is misunderstood. Review contour plots, cross sections, boundaries, and unusual spikes before trusting the total.
The best workflow combines digital speed with a manual reasonableness check. If a small pad calculation suggests a volume equivalent to a large building, revisit the inputs.
⚠️ Avoid the most common estimating mistakes
Most earthwork errors are not advanced mathematical failures. They come from missed scope, inconsistent assumptions, or overlooking how the work will actually be built.
- Using only corner levels on uneven ground
- Mixing metres, millimetres, feet, or yards in one calculation
- Combining cut and fill instead of reporting each separately
- Ignoring topsoil, working room, side slopes, or unsuitable material
- Assuming all excavation is suitable structural fill
- Using bank volume directly for truckloads or imported compacted fill
- Forgetting pavement, slab, pipe, and bedding thicknesses
- Rounding every intermediate number too early
Each mistake can be small on its own. Several together can turn a reasonable estimate into a costly surprise.
🔎 Perform a reasonableness check before finalizing
Check the plan area and average depth first. A 200 m² platform with an average cut of 0.25 m should be in the order of 50 m³, before allowances. This quick mental estimate can reveal an extra zero or incorrect unit.
Compare the result with the visible site geometry. Are the highest cuts located on the uphill side? Does the proposed drainage fall point in the intended direction? Does the total stripped topsoil correspond approximately to its measured area and depth?
Independent checks are especially valuable when a calculation has been copied between drawing revisions.
📋 Build allowances openly, not invisibly
Preliminary estimates often need allowances for survey uncertainty, irregular boundaries, soft spots, construction tolerances, shrinkage or bulking, and design development. These are legitimate uncertainties, not reasons to hide arbitrary quantities.
State the basis of each allowance in plain language. For example: “Excavation volume based on grid survey; side-slope extent to be confirmed after trench protection method is selected.”
Open assumptions allow the owner, contractor, and designer to discuss risk before work starts rather than argue after material has been moved.
🦺 Recognize when professional input is needed
Small does not always mean simple. Professional survey, geotechnical, drainage, structural, or construction advice is appropriate where there are steep slopes, deep excavations, retaining walls, suspected contamination, groundwater, nearby buildings, utilities, or significant public-safety consequences.
Formal permits and local requirements may also affect grading, erosion control, excavation support, material disposal, and drainage. Requirements vary by location and project type.
An estimate should support planning, not replace site investigation, approved design, or safe construction procedures.
🧠 A practical sequence for small-project estimating
A repeatable sequence reduces omissions and makes the work faster over time:
- Define the work limits and proposed finished levels.
- Survey existing ground at adequate spacing.
- Identify layers, structures, trenches, and stripping areas.
- Choose a suitable method: prism, average-end-area, grid, or a combination.
- Calculate in-place cut and fill separately.
- Adjust for side slopes, working room, material suitability, and volume change.
- Convert quantities for hauling, import, disposal, and compaction.
- Check results against site geometry and document assumptions.
This sequence works because it moves from physical conditions to calculation, then from calculation to construction reality.
🌉 The core principle: model the ground honestly
Reliable earthwork estimating is not about finding one magical formula. It is about representing the site closely enough for the decision being made, while acknowledging what is uncertain.
Use simple geometry for simple, measured conditions. Increase survey density and calculation detail as terrain, consequences, or project value increase. Keep material state—bank, loose, and compacted—visible throughout the estimate.
The most useful earthwork estimate is a clear model of existing ground, proposed ground, and the practical steps required to move material between them.
Measure carefully, separate cut from fill, account for how soil behaves after excavation and compaction, and document every assumption. Those habits turn a rough quantity into a dependable construction-planning tool. 🚜📐🌱